How to set up Android Pay on your smartphone!
Android Pay is a very convenient payment feature for Android smartphones. Today let us see how to correctly set up this handy feature so that your Android experience gets even better!

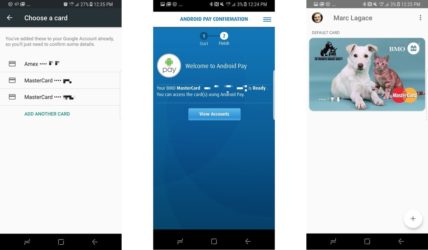
How to set up Android Pay
First, you need to add a credit card or debit card to the Android Pay app. While the app uses any credit or debit card already associated with your Google Play account, you may still want to use another card. Just launch the app, press the “+” icon, choose “Add a credit or debit card.” Then, follow the on-screen instruction to add your card. You can decide to scan your card via the phone’s camera or enter the details manually. After you finish setting up, you may need to activate such usage of your card with the bank.
If you have a loyalty program card, you can also add it in the Android Pay app as well. Start the same as above, launch the app, press the “+” symbol, but this time choose “Add a loyalty program.” Then, you use the search bar to find the name of the loyalty card you want to add to the app. Once you have seen the right card, use the phone camera to scan the barcode of the card, or insert its details in manually. After doing so, you have successfully added your loyalty program card.
The final type of card you may want to add to Android Pay is the gift card. The initial steps are the same as the above: launch the app, choose the “+” icon, but now choose the “Add a gift card” option. Next, use the search bar to find the related business for the gift card you are using. In the final step, enter the gift card details, and then tap “Save.” Now, you have successfully added your gift card for Android Pay use!
Android Pay: Make your payment more comfortable
Those are the steps to add different types of payment cards to your Android Pay app. Hopefully, those tips can make your Android payment more comfortable!
You May Like
-
 Nokia Black Titan 2026: كاميرا 250MP، ذاكرة 24GB وبطارية 17500mAh!
-
 Nokia Thunder Max 2026: ذاكرة 24GB، كاميرا 200MP وبطارية 18100mAh!
-
مواصفات Nokia Black Titan 2026: كاميرات 250MP، ذاكرة 24GB وبطارية 17500mAh!
-
Nokia Black Titan 2026 Specs: 250MP Cameras, 24GB RAM, 17500mAh Battery!
-
مواصفات Nokia Thunder Max 2026: كاميرات 200MP، ذاكرة 24GB وبطارية 18100mAh!
-
Nokia Thunder Max 2026 Specs: 200MP Cameras, 24GB RAM, 18100mAh Battery!
-
 Nokia Maze Xtreme 2026 Specs: 200MP Cameras, 12000mAh Battery!
-
Nokia XS Max 2026 Specs: 200MP Cameras, 10600mAh Battery!
-
 Nokia P1 Lite 2026 Specs: 200MP Cameras, 11000mAh Battery!